GitLab Instance Installation and Configuration
This app note provides the information required to set up a self-managed GitLab infrastructure composed of a GitLab instance, GitLab runners with the shell or docker executors, and a private Docker registry. Instructions from the section about GitLab runners can be applied both to the software distributed in on-premise and SaaS delivery model.
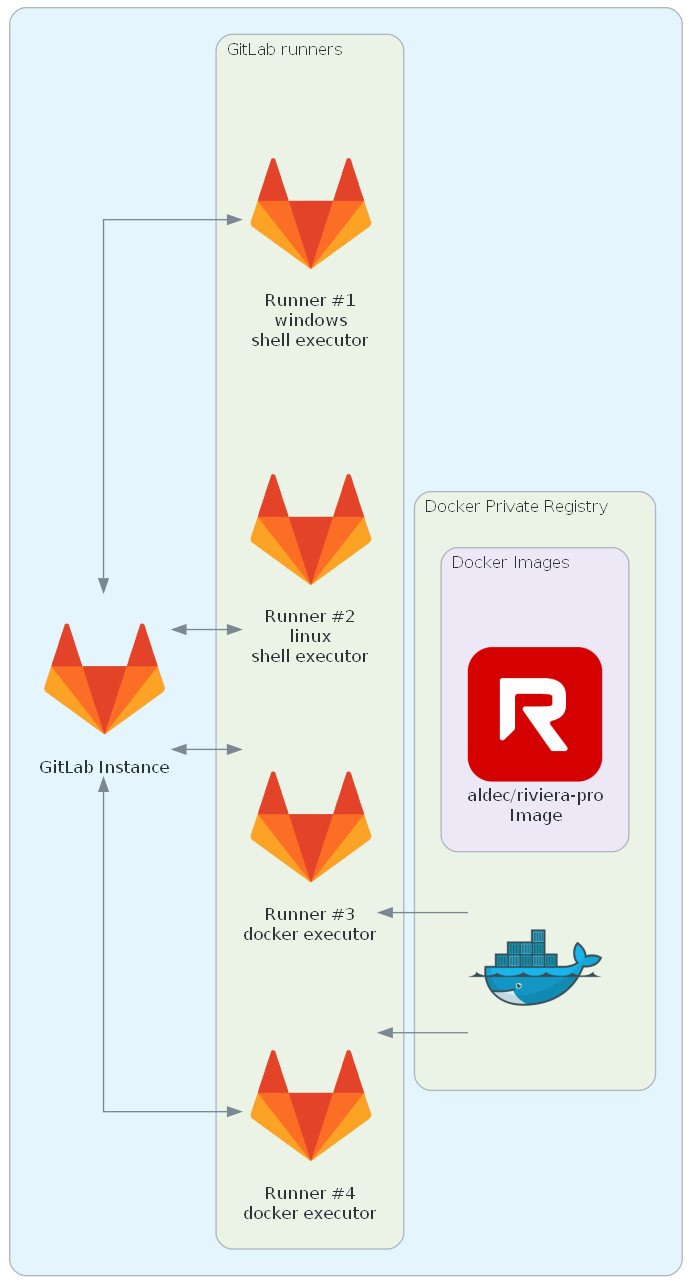
Figure 1. A sample structure that can be built by following this guide.
GitLab Instance Installation
The official GitLab documentation describes in detail several installation methods. For the purposes of this application note, we will conduct the installation of the Linux package on the Ubuntu distribution.
First, install all necessary dependencies:
sudo apt-get update
sudo apt-get install -y curl openssh-server ca-certificates tzdata perl
Add the GitLab package repository:
curl https://packages.gitlab.com/install/repositories/gitlab/gitlab-ce/script.deb.sh | sudo bash
Finally, install the GitLab Community Edition package:
sudo EXTERNAL_URL="http://<HOSTNAME_OR_IP>" apt-get install gitlab-ce
The EXTERNAL_URL variable specifies the URL of the GitLab page. There is also a possibility to use the IP address instead of the name (e.g. http://10.0.10.128) if the DNS service in your local network is not properly configured. Note that the URL given as an example uses the HTTP protocol. If you want to use encryption, please follow the instructions from the Enable HTTPS section of the GitLab documentation.
After installation is accomplished, a randomly generated root password is saved to the /etc/gitlab/initial_root_password file.
GitLab Runner Installation and Registration
GitLab supports multiple types of runner installations. Their detailed description can be found in the runner section of the official GitLab documentation. This application note covers only the most popular configurations of runners and executor types.
Installing GitLab Runner from Linux Package
Before calling the system package manager, the official GitLab repository has to be added. Depending on the distribution you are using, the following commands need to be issued:
Debian/Ubuntu/Mint
curl -L "https://packages.gitlab.com/install/repositories/runner/gitlab-runner/script.deb.sh" | sudo bash
sudo apt-get install gitlab-runner
RHEL/CentOS/Fedora
curl -L "https://packages.gitlab.com/install/repositories/runner/gitlab-runner/script.rpm.sh" | sudo bash
sudo yum install gitlab-runner
Installing GitLab Runner on Windows System
Create a folder, e.g. C:\GitLab-Runner.
Download the 32-bit or 64-bit GitLab Runner binaries and save them in the above directory.
Rename the executable to gitlab-runner.exe.
Run the following commands in an elevated command prompt:
cd C:\GitLab-Runner
.\gitlab-runner.exe install
.\gitlab-runner.exe start
Running GitLab Runner inside a Docker Container
This approach requires the Docker engine installed and an account with permissions for launching the Docker application on your system.
docker run -d --name gitlab-runner --restart always \
    -v /srv/gitlab-runner/config:/etc/gitlab-runner \
    -v /var/run/docker.sock:/var/run/docker.sock \
    gitlab/gitlab-runner:latest
Choosing Executor Type
The executor defines how the jobs are executed. GitLab Runner supports multiple executor variants that are described in detail in the executors section of the official documentation. In this application note, we will discuss the most popular ones.
shell
This is the simplest executor to set up. It is the most useful when the tools required by the jobs are installed directly on the host. When this type of the executor is combined with the runner installed on the Windows system, you may be faced with an issue with a missing shell application. This is because the default shell for this configuration is pwsh which may be missing from your machine. To fix this issue, edit the C:\GitLab-Runner\config.toml configuration file and replace the default shell with the following one:
shell = "powershell"
All the tools used in the jobs should be added to the system-wide PATH environment variable, as the processes of the GitLab jobs are usually not owned by the user. On the Windows operating system, they should be specified in the PATH variable from the System Variables section of the Environment Variables window. When it comes to Linux, various distributions may have different methods of defining global environment variables so that Ubuntu, for example, uses the /etc/environment file. Please refer to the documentation pages of your distribution for detailed information.
docker
The jobs are executed in the Docker container. This is the recommended way of queuing for the jobs that have the image section specified. Together with the private registry described later, this approach allows the user to easily distribute and manage dependencies required by the job script.
Registering GitLab Runner
Before the runner can accept the jobs, it must be registered in the GitLab instance. There are two types of runners:
Shared runner
This type of runner is available for every project run on a self managed GitLab instance and can be registered by the administrator in the Admin Area by selecting CI/CD | Runners and clicking New instance runner.
Project runner
This runner type can be registered in the project settings by selecting Settings | CI/CD, expanding the Runners section and clicking the New project runner button. It can run the jobs only from the project for which it is created. The registration can be made by the user with the Maintainer role and this kind of runner can be used in the same way in the SaaS and self-managed GitLab instances.
The runner registration page looks identical in both cases:
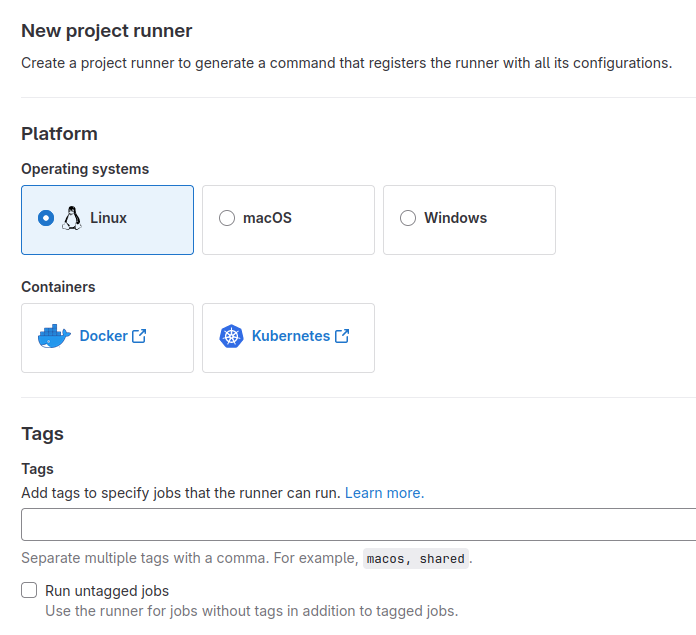
Figure 2. The runner registration page.
Perform the following steps to register the runner:
Pick the platform on which the runner is installed. Choose Linux for installation in a docker container.
Specify the tags. The job can be executed on the runner if and only if the runner has all the tags listed in the job's specification located in the .gitlab-ci.yml file. If you are creating environment for the GitLab integration as it is presented in GitLab and Riviera-PRO Integration, enter the riviera-pro tag here.
Check the Run untagged jobs option if the runner should be able to run jobs without any tag.
Click the Create runner button.
Write down the token value as it will be required in the next step.
Next, launch the registration command. The command varies between the operating systems and the runner installation type:
Windows
.\gitlab-runner.exe register
The command needs to be executed in the GitLab Runner installation directory.
Linux
gitlab-runner register
Docker
docker exec -it gitlab-runner gitlab-runner register
By default, the registration proceeds in an interactive mode. You will be asked to enter some data during the process such as the GitLab instance URL or the registration token:
root@8388bbcd765a:/# gitlab-runner register
Runtime platform                                    arch=amd64 os=linux pid=129 revision=c72a09b6 version=16.8.0
Running in system-mode.

Enter the GitLab instance URL (for example, https://gitlab.com/):
http://gitlab-server
Enter the registration token:
glrt-sV2SyHxjRWzZjyzzw_zG
Verifying runner... is valid                        runner=sV2SyHxjR
Enter a name for the runner. This is stored only in the local config.toml file:
[8388bbcd765a]: my_custom_name
Enter an executor: virtualbox, docker, docker-autoscaler, custom, shell, ssh, parallels, docker-windows, docker+machine, kubernetes, instance:
docker
Enter the default Docker image (for example, ruby:2.7):
aldec/riviera-pro:latest
Runner registered successfully. Feel free to start it, but if it's running already the config should be automatically reloaded!

Configuration (with the authentication token) was saved in "/etc/gitlab-runner/config.toml"
Private Docker Registry
The Docker Registry is an application that allows the user to store Docker images used in jobs and distribute them among GitLab runners. Furthermore, the application itself is a Docker image so it needs a configured docker engine to run. Execute the following command to create and run the Docker Registry container:
docker run -d -p 5000:5000 --restart always --name registry registry:2
Note that registry created in that way will use the insecure HTTP protocol. In order to make it work with GitLab runners, you will need to update the docker engine configuration file on every GitLab runner host that uses the docker executor. Open the /etc/docker/daemon.json file or if it does not exist, create it. Add the IP address or the hostname of the Docker Registry to the list of insecure registries:
{
    "insecure-registries" : [ "<REGISTRY_HOSTNAME_OR_IP>:5000" ]
}
If you need an encrypted communication between GitLab runners and the registry, follow the official configuration guide to setup the TLS protocol.
To upload a local docker image to the private registry, first it needs to be tagged with the registry prefix. The below example shows how to prepare a basic, locally-created Riviera-PRO image:
docker tag aldec/riviera-pro:latest <REGISTRY_HOSTNAME_OR_IP>:5000/aldec/riviera-pro:latest
Then, run the push command:
docker push <REGISTRY_HOSTNAME_OR_IP>:5000/aldec/riviera-pro:latest
Now the image can be used in the GitLab jobs by specifying its name with the registry prefix in the .gitlab-ci.yml file.
image: <REGISTRY_HOSTNAME_OR_IP>:5000/aldec/riviera-pro:latest
The image will be automatically pulled by the GitLab runner from the private registry and stored in the local cache.
Corporate Headquarters
2260 Corporate Circle
Henderson, NV 89074 USA
Tel: +1 702 990 4400
Fax: +1 702 990 4414
https://www.aldec.com
©2026 Aldec, Inc.