HW/SW co-simulation solution for Zynq SoC based systems using Riviera-PRO and QEMU
With the increasing popularity of heterogenous architectures, HW/SW co-verification has become a new challenge for FPGA engineers. The Xilinx Zynq FPGA device is an ever-growing SoC which consists of an ARM processor and FPGA programable logic. In SoC FPGAs such as Zynq, the embedded software applications run on the ARM processor and the hardware IPs are implemented in the programmable logic. A new type of system simulation is needed where both the software and hardware parts are integrated and running concurrently.
Aldec provides a HW/SW co-simulation interface between Riviera-PRO and Xilinx's Quick Emulator QEMU such system simulation. System integration and co-simulation of HDL code, with software applications/drivers executing in QEMU, are now simplified with a full compilation of SystemC to library (LibSysytemCTLM-SoC). It is executed under the Riviera-PRO simulator. The LibSysytemCTLM-SoC shares Remote Port to connect both Riviera-PRO and QEMU, and it converts SystemC TLM transactions to AXI, and vice versa, providing a fast interface for co-simulation.
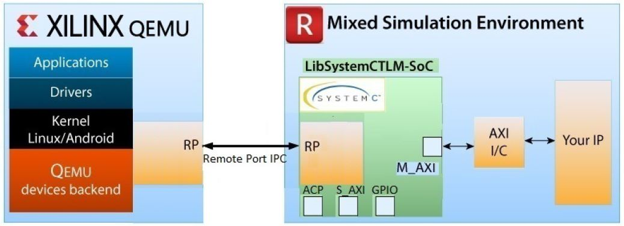
Figure 1: HW/SW co-simulation environment using Xilinx QEMU and Riviera-PRO
In this app note, we will show you how to easily verify your Xilinx Zynq SoC based designs using Riviera-PRO and Xilinx QEMU.
Software Requirements:
Aldec Riviera-PRO 2021.10
Xilinx Vivado 2021.1
Xilinx Petalinux 2021.1
Note: If you haven't installed PetaLinux, make sure you are not using a root user to install it. It has to be installed under the home directory of a non-root user.
Note: If you don't have the Xilinx simulation libraries setup on your Riviera-PRO tool, follow this document to generate it.
Limitations:
Windows is not supported.
Supported platforms: Red Hat Enterprise Workstation/Server 7.4, 7.5, 7.6, 7.7, 7.8, 7.9, 8.1, 8.2 (64-bit) CentOS Workstation/Server 7.4, 7.5, 7.6, 7.7, 7.8, 7.9, 8.1, 8.2 (64-bit) Ubuntu Linux Workstation/Server 16.04.5, 16.04.6, 18.04.1, 18.04.2, 18.04.3, 18.04.4,18.04.5, 20.04, 20.04.1 (64-bit)
This example is verified with Operating Systems: CentOS 7.x and Ubuntu 20.04.
Preparing project source files
Let's prepare the files to run the co-simulation. The first step requires a Vivado Zynq SoC project, which is also used to generate the simulation model. This model is then connected to the TLM sockets and the Zynq processing system is emulated on the QEMU platform. Communication between the SW and HW layers takes place via the Remote Port. To facilitate the co-simulation process, Aldec provides a GitHub repository with scripts for building and running project files. The repository contains a Vivado design example that blinks LEDs and works with switches on the TySOM-1-7Z030 board. Users can also use their own design examples and replace it with what we have provided in the GitHub folder.
The prebuilt files are available on GitHub, however, in the next chapter we explain how to generate them.
Creating a hardware project in Vivado
Before generating any HW in Vivado for TySOM boards, the best practice is to add the TySOM board files in Vivado. You can find these files under Aldec github/<TySOM Board Name>/Vivado-board_files.
Here is a tutorial on how to add the TySOM board files to a Vivado version older than 2021.1.
For Vivado versions 2021.1 and newer: you will need to run the following command and add the path to the TySOM board files downloaded on your system.
set_param board.repoPaths [list <path-to-TySOM-board-files>]
After adding the board files to Vivado, follow the steps below:
Source Vivado settings and run Vivado.
Create a project for TySOM-1-7Z030 board.
Create a block design.
Add Zynq7 Processing system IP core.
Add two AXI GPIO IP and connect one to User LEDs and the other to User Switches.
Run all of the connection automation.
The final block design should look like Figure 2.
The axi_gpio_0 (user switches) is on 0x41200000 address. The axi_gpio_1 is on 0x41210000 address. Save and validate the design.
Create HDL Wrapper and generate bitstream.
Export Hardware including the bitstream.
As a result, an .xsa file should be created, which will be used in the next step to prepare the PetaLinux project.
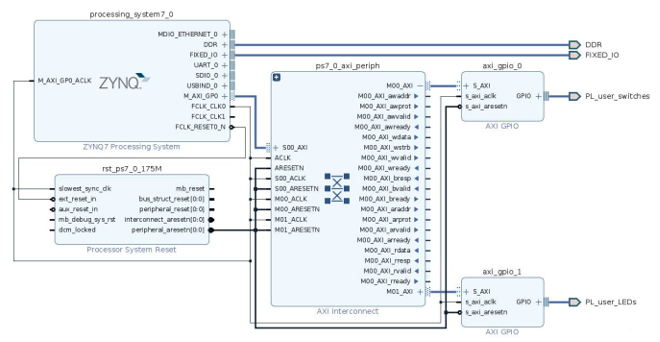
Figure 2: Vivado block design
Preparing design for co-simulation
To prepare the co-simulation files, we need a Xilinx Support Archive (XSA). This file is already prepared and is available in the GitHub repository under the <example_hw> folder. To prepare a co-simulation based on your own project, just replace the default .xsa file with yours. The design will use that one.
Note: Before starting the scripts, set the correct paths to the tools. They are located in the config.sh file.
export RIVIERA_PATH=<path_to_Aldec_Riviera-PRO-2021.10-x64>
export PETALINUX_PATH=<path_to_Xilinx_petalinux-v2021.1>
export VIVADO_PATH=<path_to_Vivado_2021.1>
The process of generating sources is started by running the following command:
$ ./prepare_files.sh
Note: This step may take about 30 minutes for the PetaLinux project to build.
The sample result from running the script:
PetaLinux environment set to '/edatools/Xilinx/Linux/petalinux-v2021.1'
INFO: Checking free disk space
INFO: Checking installed tools
INFO: Checking installed development libraries
INFO: Checking network and other services
INFO: Create project: tysom1_petalinux
INFO: New project successfully created in
/home/systemc_qemu_cosim/tysom1_petalinux
[INFO] Sourcing buildtools
INFO: Getting hardware description...
INFO: Renaming design_1_wrapper.xsa to system.xsa
[INFO] Generating Kconfig for project
[INFO] Silentconfig project
[INFO] Extracting yocto SDK to components/yocto. This may take time!
[INFO] Sourcing build environment
[INFO] Generating kconfig for Rootfs
[INFO] Silentconfig rootfs
[INFO] Generating plnxtool conf
[INFO] Adding user layers
[INFO] Generating workspace directory
[INFO] Sourcing buildtools
[INFO] Building project
[INFO] Sourcing build environment
[INFO] Generating workspace directory
INFO: bitbake petalinux-image-minimal
[INFO] Sourcing buildtools
[INFO] Building device-tree
[INFO] Sourcing build environment
[INFO] Generating workspace directory
INFO: bitbake virtual/dtb
NOTE: Started PRServer with DBfile:
[INFO] Successfully built device-tree
Could find Processing System in file
Genenerated the following files :
riviera//../src/design_1_processing_system7_0_0.vhd
riviera//zynq7_compile_cosim.do
riviera//all.do
Running co-simulation
After successfully building the sources, the last step is to run the co-simulation process. The easiest way to do this is to use a run_example_cosim.sh script.
./ run_example_cosim.sh
Now, the QEMU process should appear in a new terminal window and in the meantime, the co-simulation in Riviera-PRO should begin.
After booting the Linux system, the LEDs can be tested with the devmem command:
root@tysom1_petalinux:# devmem 0x41210000 8 0x55
After each change inside the PetaLinux window, you will need to refresh the simulator to show the new values. You can also stop the simulation and run it again to see the effected results.
After running the command above, the Riviera-PRO waveform should be a 0x55 value on the LEDs signals.
The following command should read back the value that was previously set on the LEDs:
root@tysom1_petalinux:# devmem 0x41210000 8
0x55
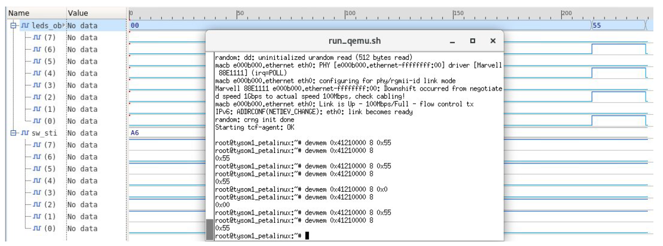
Figure 3: Example view of running co-simulation
Known Issues
Here are a couple of known issues that you might face:
The Linux system may hang for quite a long time on the following lines:
random: crng init done
Starting tcf-agent: OK
After co-simulation is finished, it is recommended to first turn off Riviera-PRO and then QEMU. The crash in the console may appear in the reverse order.
You might not have enough "fs.inotify.max_user_watches" which will cause the following errors:
ERROR: No space left on device or exceeds fs.inotify.max_user_watches?
ERROR: To check max_user_watches: sysctl -n fs.inotify.max_user_watches.
ERROR: To modify max_user_watches: sysctl -n -w fs.inotify.max_user_watches=<value>.
ERROR: Root privilege is required to modify max_user_watches.
You can increase this value by using the following command:
sysctl -n -w fs.inotify.max_user_watches=<value
Corporate Headquarters
2260 Corporate Circle
Henderson, NV 89074 USA
Tel: +1 702 990 4400
Fax: +1 702 990 4414
https://www.aldec.com
©2026 Aldec, Inc.