Customizing Linting Policy
Table of Contents
Introduction
ALINT-PRO provides a large number of rules to support verification of RTL designs. The rules originate from various sources, including semiconductor manufacturers' best practices, popular design rule guidelines, as well as Aldec in-house experience and customer feedback. The rules are highly configurable and can be adjusted to particular technology and designer's needs and style preferences. The exact set of enabled rules and the values of rule configuration parameters form one of the most important artifacts - a linting policy. This application note shows how to configure linting policies to address specific design requirements.
Linting Policy
Linting is one of two key workflows foreseen by ALINT-PRO and includes five subphases. Each subphase analyzes the HDL code for potential errors and can be run if the corresponding dependent design entry phase has been finished successfully. The designer should attempt to analyze every violation detected during linting and displayed in the Violation Viewer window. The correction must be introduced, then the analysis should be re-run until all the detected violations are fixed. More detailed information about the workflows is given in the 'Getting started with ALINT-PRO' Application Note.
Since the exact design guidelines may vary depending on the technology, organizational culture, or designer's personal background, ALINT-PRO provides a flexible configuration mechanism, known as a linting policy. Correct selection of rules and setup of configuration settings help to avoid running unnecessary checks and reduce the number of design correction iterations.
For example, a typical FPGA-based project will expect using synchronous active-high resets, while an ASIC design most often assumes an active-low asynchronous reset control instead. A book on ASIC design might suggest clock gating as a method to reduce power consumption, however, a direct use of the same RTL code in an FPGA might lead to very poor timing properties. Linting policy adjustment is a good method to resolve such technology differences.
A linting policy represents a set of rules enabled for the analysis, as well as the values of provided rule configuration parameters. A policy is an important reusable and valuable artifact that can represent the coding guidelines accepted within the organization for a certain class of designs and can be applied to many similar projects.
Global and Project Policy
The verification process can be configured for all workspaces at once (global policy) and for a particular design (project policy).
Initially, global policy enables rules from the predefined DEFAULT ruleset with the default values of configuration parameters. The global policy affects all ALINT-PRO projects unless they define their own policy.
Project-specific policy inherits the default values from the global policy. The list of rules might be shortened or extended, and the parameter values can be modified also. As soon as a project-specific policy is established, it is no longer connected to the global policy - further changes to global policy will not affect project-specific policy.
Policies can be modified within the Policy Editor window. Global Policy Editor is accessible from the Linting | Policy page of global Preferences while Project Policy Editor can be opened with the pop-up menu: right-click a project's node in the Project Manager window and select the Properties option, then go to Linting | Policy page.
Project Policy Editor has a check box in the upper-right corner of the window to change the policy scope from the global one to the project and vice versa. Uncheck this box to begin customizing the project specific policy. Unless this check box is unchecked, the project will continue using the global policy, the project policy will remain inactive, and all the nodes of the ruleset tree will be grayed out.
You can reverse back to using global policy by checking the same check box again. Please be aware that in case you leave the global policy mode checked and close the Project Properties window, the previous project-specific policy settings will be cleared.
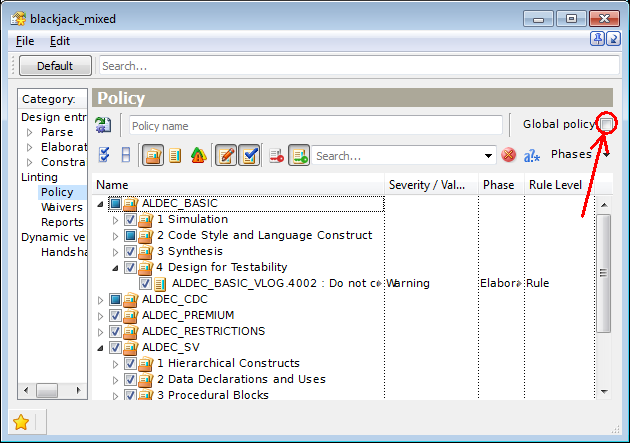
Figure 1. Project Policy Editor
If you change the policy for a single project only, you should remember that all the other projects within the workspace (if any) remain under the global policy. Each project keeps its own independent relation with the global policy.
You can name the project policy configuration in a special text box at the top of Policy Editor. After the linting the name will be included in the violations and quality reports.
Linting Policy Configuration
Rule Views and Filtering
All the rules in Policy Editor are organized into a hierarchical tree by topics, design areas, or methodologies they cover. Ruleset View is displayed by default, and it groups the rules by topic-based classification within each rule plug-in.
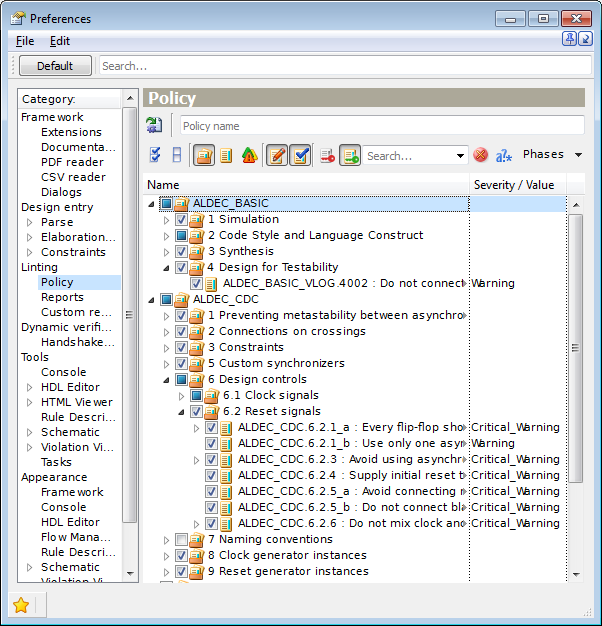
Figure 2. Ruleset View
Other viewing modes are accessible via toolbar buttons. The Show Rules View button displays all the rules included into a plug-in in a form of a plain list under the rule plug-in node.
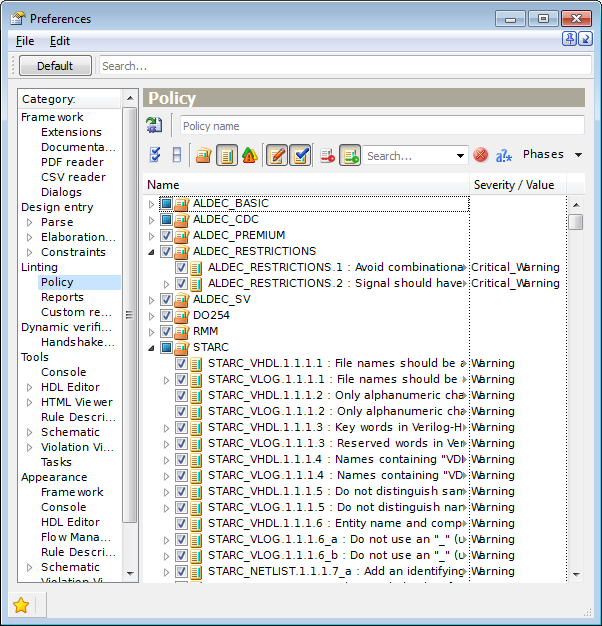
Figure 3. Rules View
The rules can also be ranked by the rule level (use the Show Rule Levels View button).
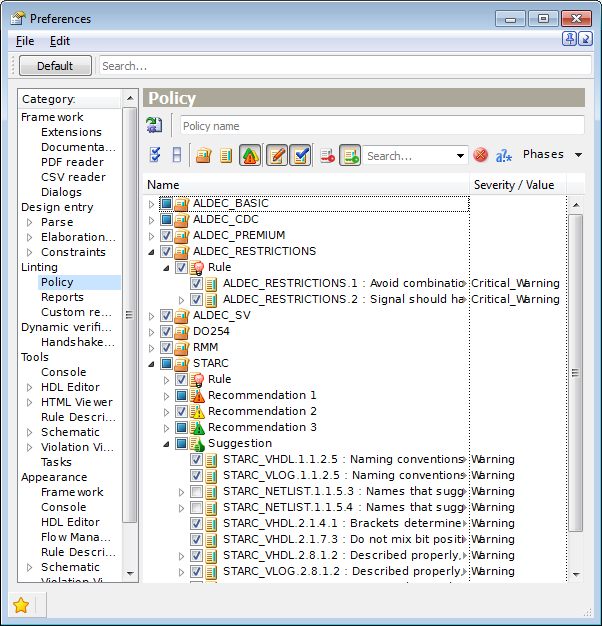
Figure 4. Rule Levels View
The check box in the leftmost column of each rule node indicates whether the corresponding rule is enabled. Parent nodes representing rulesets also have a similar check box, which could be in one of 3 possible states: all rules disabled (unchecked), all rules enabled (checked), partially enabled (intermediate state). Changes on parent nodes are allowed - all the inner individual rules will be enabled or disabled recursively. Besides this, you can enable/disable from the analysis all the policy rules at one click: click the Mark All Rules or Unmark All Rules button located on the Policy Editor toolbar. To uncheck all rules or nodes except a particular one, use the Unmark Others pop-up menu option for this node.
Note. When enabling a rule for the design checking, please pay attention to the license restrictions. Do not attempt to enable unlicensed rules, otherwise, numerous license availability warnings will be printed during linting. To display a list of currently unlicensed rules (hidden by default), there is a special Show/Hide Unlicensed Rules button on the Policy Editor's toolbar.
You can also filter out the rules, which are not currently used in the policy - just click the Show/Hide Unmarked Rules button.
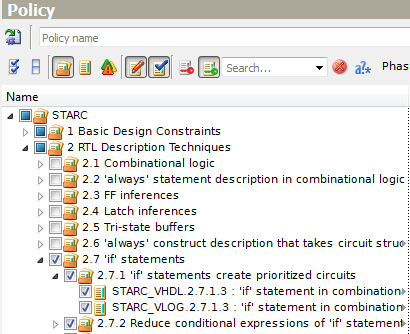
Figure 5. Show/Hide Unmarked Rules
Each rule is associated with a particular linting phase shown in the Phase column. This column is hidden by default, however, it can be displayed by right-clicking on the header line and selecting its name in the menu. A single rule can only belong to a single linting phase. The Phases drop-down menu in the upper-right corner of the window filters rules in the tree: just check only those linting phases you are interested in seeing at the moment.
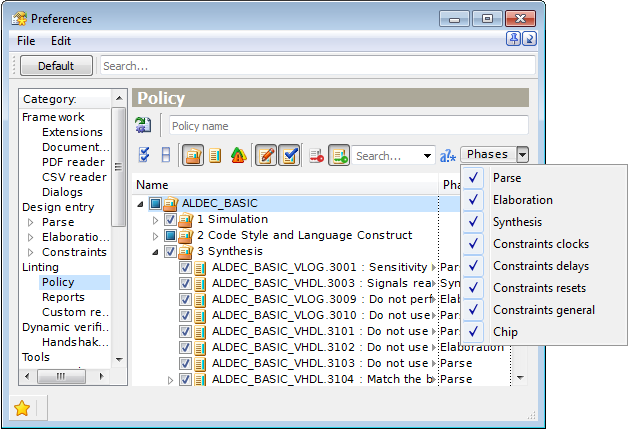
Figure 6. The Phases Drop-Down Menu
One of the useful utilities is an ability to expand multiple selected parent nodes in pop-up menus. Multiple selections can be created using typical selection shortcuts - holding Ctrl or Shift keys when selecting.
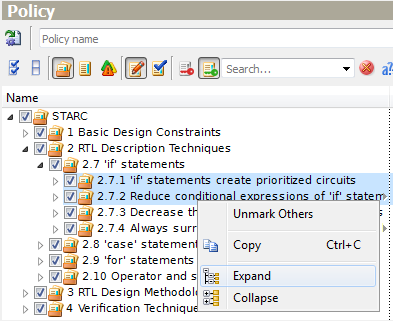
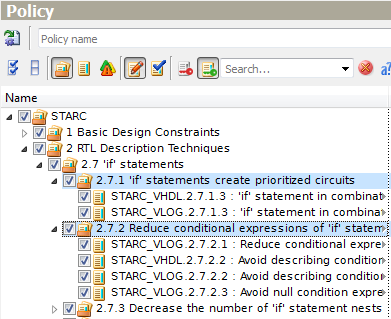
Figure 7. Expanding Multiple Grouping Nodes
Sometimes, a designer may need to find some particular rules within the installed plugins, i.e. rules about constants. This might be tricky, as there are several hundred rules supported. This task clearly requires searching functionality. Just type a word constant within the search edit box. ALINT-PRO will automatically search throughout the tree, and all the occurrences will be displayed in the window. The search pattern does not have to match the rule name exactly. It can be partial - just one word or even a fragment. Also, the pattern may contain wildcards or regular expressions for some of the advanced queries.
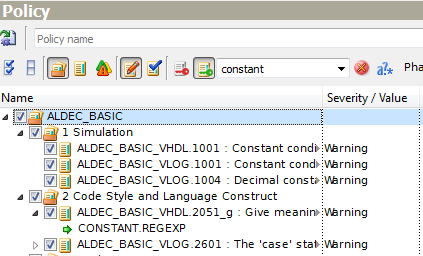
Figure 8. Search Results
Rule Parameters
Each rule node is accompanied with the rule severity and the rule level shown in separate columns. Many of the rule nodes will also contain sub-nodes for rule parameters whose values are given in the Severity / Value column.
The values of rule parameters are editable. The accepted values depend on the parameter type.
Supported parameter types, in brief, are as follows:
bool - Boolean parameter (choices between on/off, allow/deny, yes/no);
int - integer parameter (range of accepted values depends on a particular parameter);
range - range parameter. It is a pair of two integer numbers: the first one is a lower bound and the second one is an upper bound that should be greater or equal to the lower one;
string - arbitrary ASCII string (except comma, parentheses or empty string);
keyword - string parameter that accepts value from the predefined set of possible values only;
regexp - regular expression as a parameter value;
string_list - list of string values separated by commas and enclosed in parentheses;
keyword_list - list of predefined string values separated by commas and enclosed in parentheses;
comment_template - template for comments in source files;
structure - composite type that consists of several fields. Every field is a parameter that has its own type.
To configure a rule parameter, first, select the parameter's node, and double click the Severity / Value column. Select one of the suggested values (keyword parameters) or enter a custom value. Policy Editor validates user's input automatically on the fly, and will not allow to input an invalid value.
If a parameter's value differs from the default one, the modified parameter node will be formatted using bold font.
Let us consider rule STARC_VHDL.3.1.4.5 that sets the maximum number of characters in one line. This rule has the MAX_LINE_LENGTH integer parameter with default value equal to 110. We change it by highlighting the parameter name to select it and then clicking its value. A new value can be typed or input by using up and down arrows.
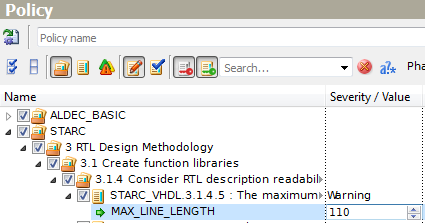
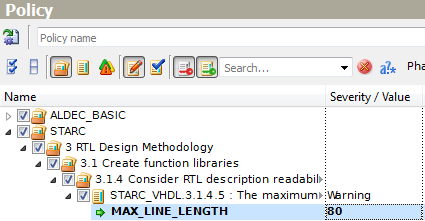
Figure 9. Changing Integer Parameter Value
In another example, rule STARC_VLOG.1.1.2.1_a has the only one range-type parameter MODULE.LENGTH with (2,32) default values. Select MODULE.LENGTH and click the value to change the limits for module names. If you try to input (2,0), ALINT_PRO forbids it because the left bound should be less than the right bound.
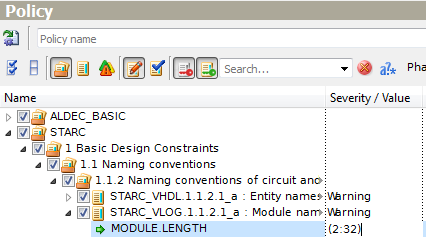
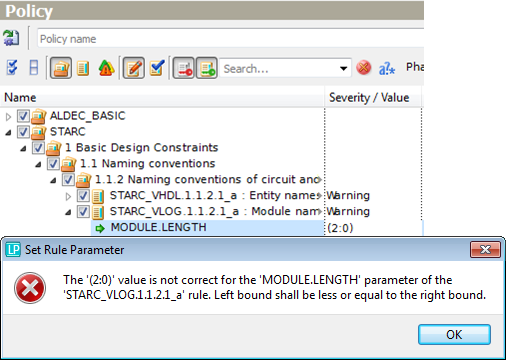
Figure 10. Changing Range Parameter Value
Rule ALDEC_BASIC_VHDL.2211 requires describing one design unit per file. This rule has the DESIGN_UNIT_TYPE parameter of keyword type which defines design unit types to be checked. The current parameter values ('ENTITY' and 'PACKAGE' by default) are collectively shown in the cell adjacent to the parameter name, each line below is devoted to each parameter value. To modify any value, click it in the Value column and select the most appropriate one from the drop-down list.
If you need to add a value, refer to the Add Value option of the pop-up menu that appears when you right-click the parameter name.
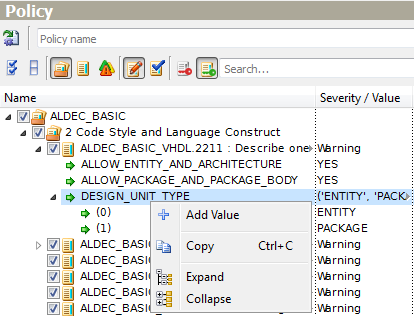
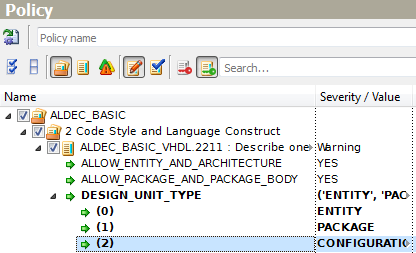
Figure 11. Add Value of List Type Parameter
Applying the Show/Hide Unmodified Rules you can minimize the view to see only the rules having modified settings.
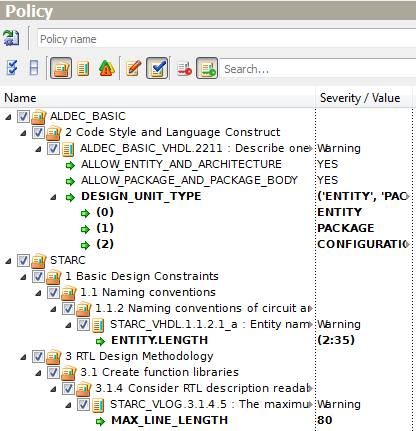
Figure 12. List of Modified Rules
Each rule has the SEVERITY built-in parameter to define the level of the rule's violation message. It is shown in the Value column next to the rule name and can take one of the following values:
info;
warning;
critical_warning;
error.
Some of the severities have special meaning. A violation of "error" severity will interrupt the linting script, while a violation of "critical_warning" severity will stop the current phase within the Flow Manager component.
Note: there are so-called restriction rules united in the ALINT_RESTRICTIONS plug-in. They have the Critical_Warning severity. Though the user is allowed switching them off, changing severity or adding waivers for them, it is strongly recommended to review the violations triggered by these rules: failing to comply with the restriction rules may lead to harmful defects.
While working on the linting policy, the designer may change the relevance of each rule by setting the Rule Level parameter:
Rule - critical importance;
Recommendation 1 - important and strongly recommended;
Recommendation 2 - average importance, may be avoided in some cases;
Recommendation 3 - low importance, has minor impact on design quality;
Suggestion - remark, shows the place to pay attention to.
Rule levels are usually used to prioritize the output violations - the most important need to be analyzed first.
Rule levels can be configured by clicking in the corresponding column and choosing a new value from the drop-down list. The same can be done by the using drag-and-drop of the rule node within the Rule Levels View.
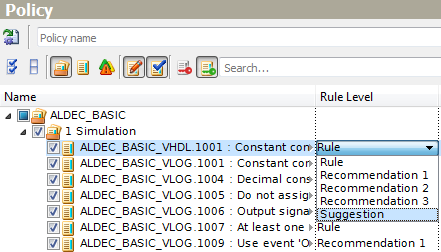
Figure 13. Changing Rule Level
Any modified parameter can be easily reversed to the default value. The Set Default Value(s) pop-up menu option restores the default values and regular type also. This command can be applied to parent nodes as well to reset the settings recursively.
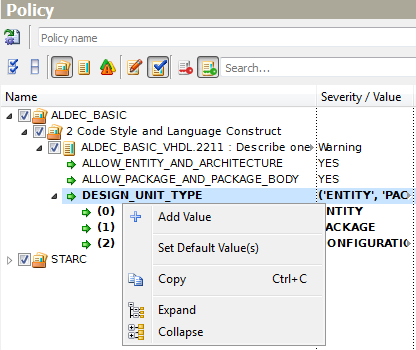
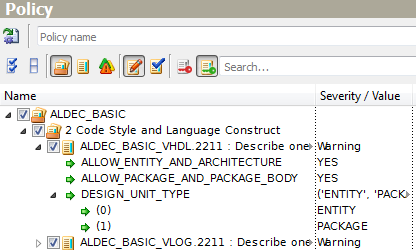
Figure 14. Restoring Default Values
When the linting policy is configured (all the necessary rules are enabled for checking, their severity and parameters are adjusted to your needs), click Save on the main toolbar or press Ctrl+S.
While working with the policy, you may need to read rule reference documentation. Right-click on any rule node and select Show Rule Description pop-up menu option. The detailed description, rule's parameters, messages, examples, etc. will be displayed in a separate window - Rule Description Viewer.
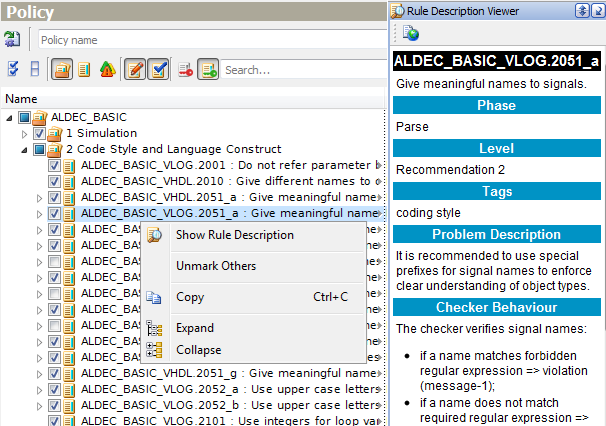
Figure 15. Policy Editor and Rule Description Viewer
Policy Editor is integrated with other GUI components. First of all, it can interact with the Violation Viewer window. Although it makes sense to invest time in preparing an efficient linting policy ahead of running the linter, it is reasonable to configure linting policy before running the verification process, the analysis of obtained results may lead to policy adjustments.
Right-clicking a rule name in Violation Viewer and selecting the Focus in Policy Editor option will focus it in the active project Policy Editor window where you can see all the rule parameter's values and adjust them if necessary.
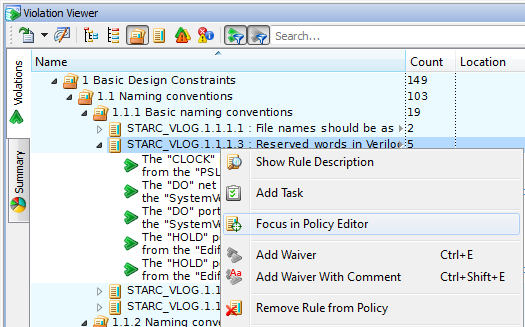
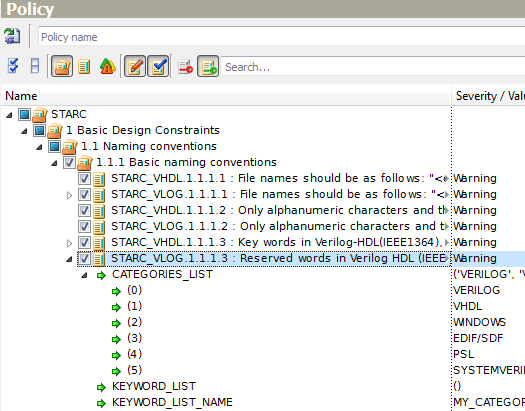
Figure 16. Rule Focus from Violation Viewer
Another option of the same pop-up menu allows removing the rule from the project policy. For example, the designer decides that the checking logic of rule STARC_VLOG.1.1.1.1 makes no sense to the particular design being analyzed. The Remove Rule from Policy pop-up menu option will uncheck this rule in the Project Policy Editor, and automatically delete the related violations without re-running the linting.
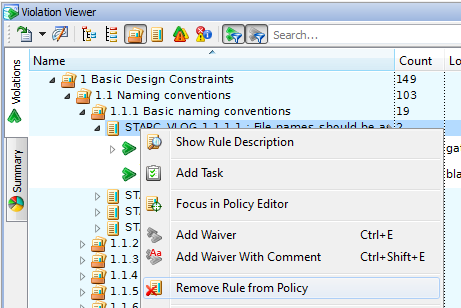
Figure 17. Remove Rule from Violation Viewer
And vice versa. The Show Violations pop-up menu option of the Policy Editor filters the violation list in the Violation Viewer window. This option is available for a single node and for multiple ones as well.
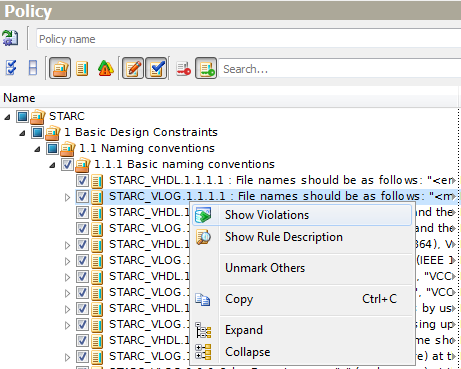
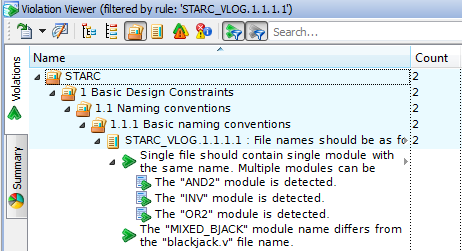
Figure 18. Show Violations from Policy Editor
Policy Export
A linting policy can be saved into a disk file and applied to a different design. To do so, click Export Policy to File on the Policy Editor toolbar. The policy will be saved in the form of an identical TCL scripting command stored in a TCL macro file (*.do). The policy name (if any) is added to the macro file as the project.policy.name command. Later, executing this TCL macro on the same or different project will produce identical policy settings.
There are three ways to apply the saved policy to another project(s) (the project should be active at that moment):
Locate *.do file in Project Manager or File Browser, choose the Execute option of pop-up menu.
On the Tools menu, click Execute Macro, locate *.do file, and then open it.
Execute the macro directly from Console using source command and supplying path to the policy script as an argument.
All these methods result in replacing the current policy with a selected one according to its type (global or project).
Command Line
If you prefer a semi-automatic interactive console mode instead of GUI, ALINT-PRO supplies a set of TCL commands to manage policy configuration.
To start from a clean state, run global.policy.clear or the project.policy.clear commands. Both will clear all settings of the corresponding policy, so, no rules will be verified during linting process.
If you decide to adjust the current policy, first of all, you will be need a list of rules included into the current global policy (use the global.policy.listrules command) or into a project one (use project.policy.listrules with the optional argument -project). The detailed information about each rule included into the policy (unique short rule name with plug-in specification, rule severity, rule level, rule title) will be displayed in the Console window if the -detailed argument is used.
Below is an example of how to add and delete a rule in the global policy:
global.policy.add -rule STARC_NETLIST.1.1.5.*
and
global.policy.delete -rule STARC_NETLIST.1.1.5.2_*
The global.policy.listrules command shows that two rules (STARC_NETLIST.1.1.5.3 and STARC_NETLIST.1.1.5.4) were added and three rules (STARC_NETLIST.1.1.5.2_a, STARC_NETLIST.1.1.5.2_b, STARC_NETLIST.1.1.5.2_c) were deleted from the policy. These examples also underline that wildcards are applicable.
ALINT-PRO also provides a number of commands for rule parameters configuration.
The following command demonstrates how to output the list of rule parameters and their values set in the global policy. (Be careful, rule level is printed only if it differs from the default one).
global.policy.showruleconfig -rule DO254_VHDL.1312
Result:
Rule DO254_VHDL.1312 configuration:
 SEVERITY = Warning (default)
 PACKAGES_LIST = (('ieee.std_logic_arith'), ('ieee.std_logic_unsigned')) (default)
In the following example, the 'ieee.std_logic_signed' string is set as the PACKAGES_LIST parameter value. Then the 'ieee.std_logic_textio' string is added to it. 'ieee.std_logic_signed', 'ieee.std_logic_textio' values form the result value list of the PACKAGES_LIST parameter.
global.policy.ruleconfig.setvalue -rule DO254_VHDL.1312 -parameter PACKAGES_LIST = ((ieee.std_logic_signed))
global.policy.ruleconfig.addvalue -rule DO254_VHDL.1312 -parameter PACKAGES_LIST = (ieee.std_logic_textio)
Confirm the end result by showing the current configuration:
global.policy.showruleconfig -rule DO254_VHDL.1312
Result:
Rule DO254_VHDL.1312 configuration:
 SEVERITY = Warning (default)
 PACKAGES_LIST = (('ieee.std_logic_signed'), ('ieee.std_logic_textio'))
Let us take as an example rule STARC_VLOG.2.9.2.3. It says that the range of the number of loops should be up to 10 if operating logically or relationally other than with loop variables and constants. We redefine the rule parameter values so that ITERATIONS_COUNT will be restricted with 8 loops and STRICT_CHECKS allows operations with non-static operands:
global.policy.ruleconfig.setvalue -rule STARC_VLOG.2.9.2.3 -parameter ITERATIONS_COUNT=8 -parameter STRICT_CHECKS=YES

global.policy.showruleconfig -rule STARC_VLOG.2.9.2.3

Rule STARC_VLOG.2.9.2.3 configuration:
 SEVERITY = Warning (default)
 ITERATIONS_COUNT = 8
 STRICT_CHECKS = YES
As you can see from the example, the -parameter argument can be used several times within a single command invocation.
Finally, you can export the modified policy to a macro-file by using global.export.policy.
Project-specific policy management is organized identically by using similar TCL commands (project. prefix instead of global.). Switch -project <project_name> can be omitted if working with the policy of an active project.
For the complete list of commands, address to ALINT-PRO documentation (see "Command Reference").
Conclusion
Policy is one of the most important configuration artifacts in Aldec linting solution. A policy represents an organization's coding practices and style choices expressed in the form of enforced rules and their concrete settings, which are generally independent of the particular functionality of the design. Although creating an efficient policy requires significant initial effort to adjust the behavior of rules to a particular design's needs and style choices, this saves a lot of time during violations analysis and code review sessions. By using the export to TCL option, the policy script can be saved under revision control system to be later re-applied in a different design. A mature policy will produce minimal output noise.
ALINT-PRO provides a feature-rich GUI for organizing policy management, as well as a flexible set of policy-related TCL commands to automate policy-related scripting.
Corporate Headquarters
2260 Corporate Circle
Henderson, NV 89074 USA
Tel: +1 702 990 4400
Fax: +1 702 990 4414
https://www.aldec.com
©2026 Aldec, Inc.